Roqqett Checkout
Overview
Roqqett Checkout is the second product of the Roqqett range, designed to create a seamless one-tap journey to checkout.
Roqqett Checkout is more than a payment option. It's a complete express checkout journey for your customers, packed with additional benefits to boost loyalty and sales. It offers customers the ability to complete their order with pre-saved details to spare them time in their future checkout journeys, along with digital receipts.
Payment flow
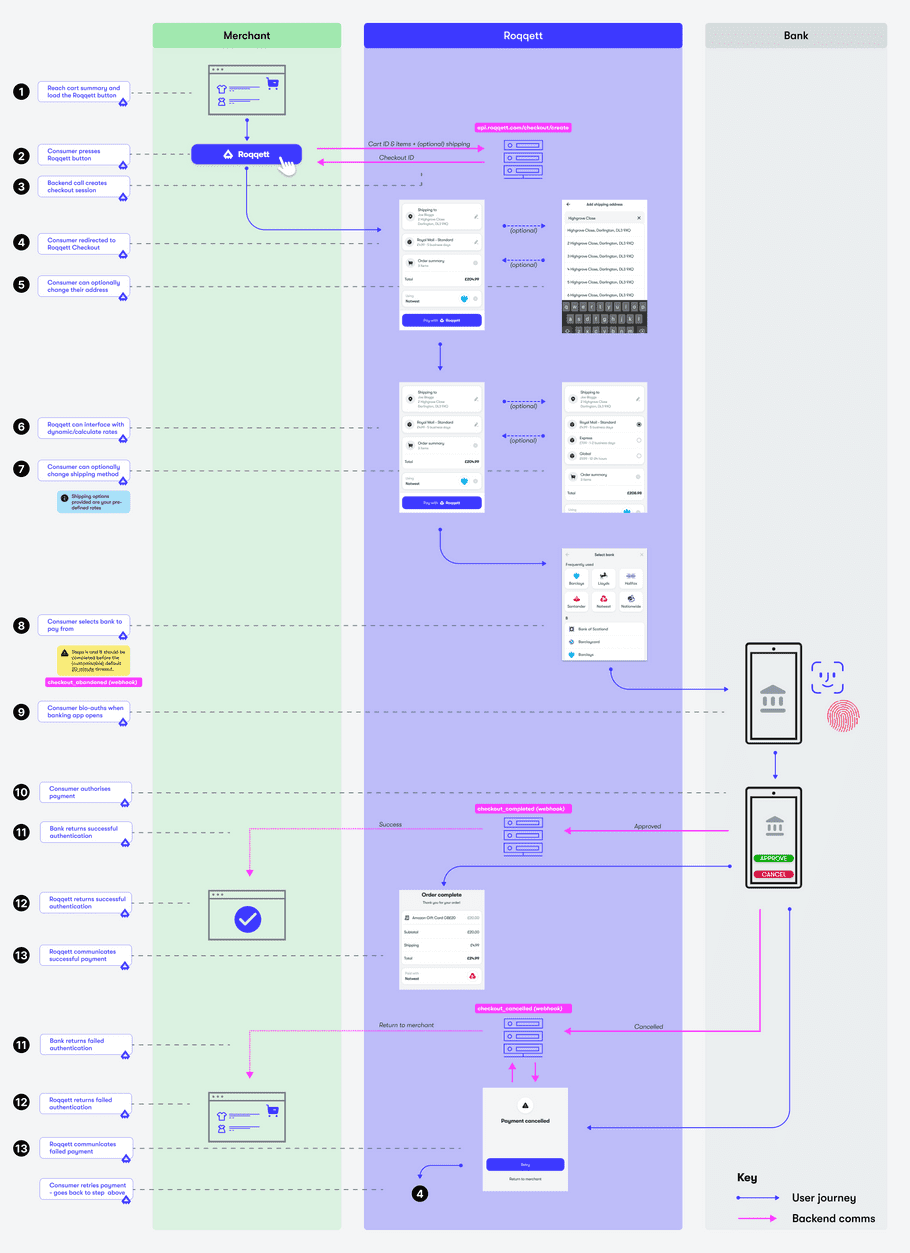
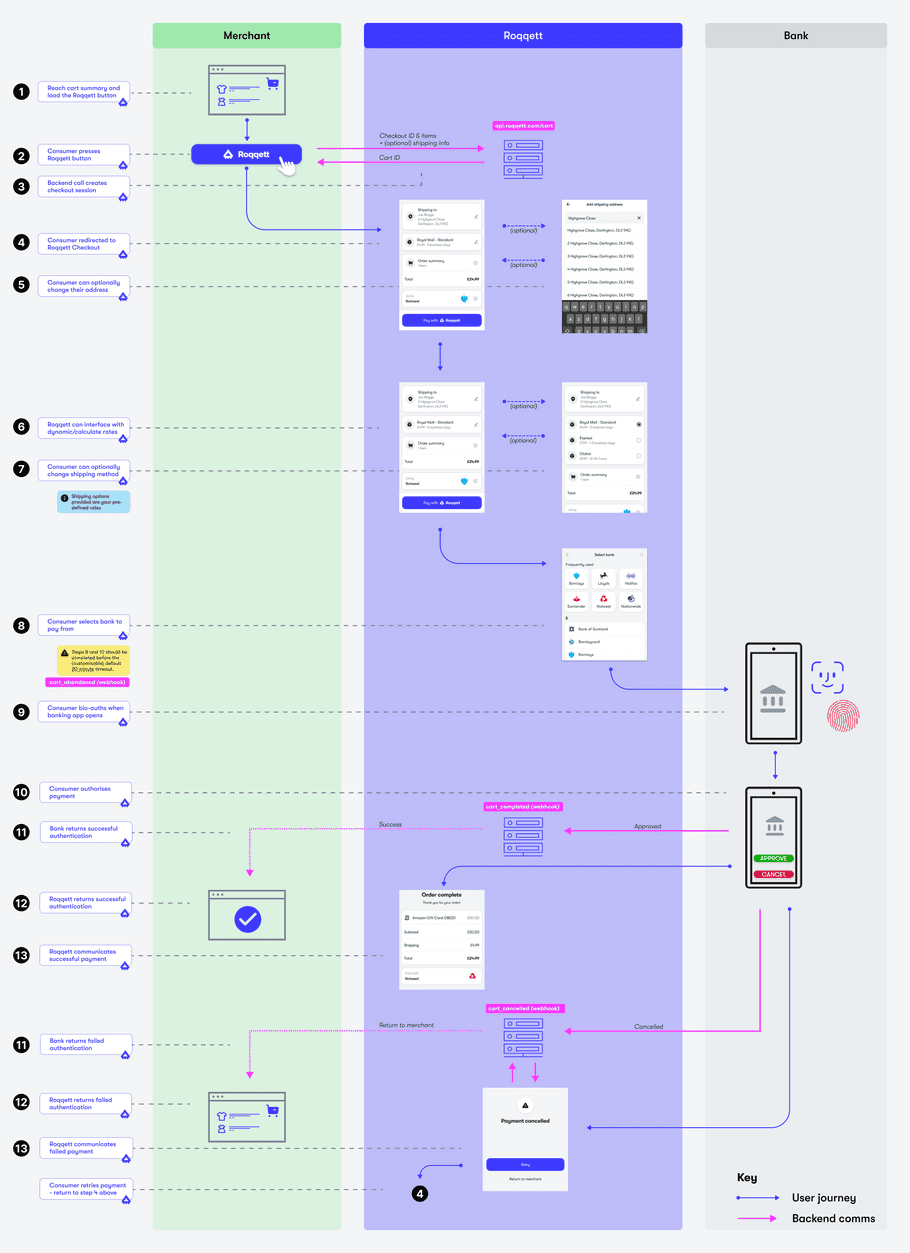
The process of initiating and completing a Roqqett Checkout payment consists of the following steps:
Steps 1-3
The customer goes to their cart (basket) summary page and you present the Roqqett checkout button. The customer then clicks the Roqqett button, which initiates the checkout session and takes to a Roqqett-hosted page.
info
The Roqqett button opens a full screen overlay that encapsulates the payment journey and prevent the users from editing their basket on your site.
Steps 4-7
These customisable steps of the journey are where, if you require, the customer confirms their shipping information and shipping method for the order. By capturing this information, Roqqett Checkout allows you to offer a fast checkout option to your customer earlier on in the checkout process.
The customer can use our address finder service to easily and quickly find their address. Roqqett Checkout can either present your pre-formatted shipping options to customers or not present them at all, in cases where no shipping is required.
info
The first time your customer uses Roqqett Checkout, they will need to provide their information — however this information is then securely stored for fast checkout in the future.
Steps 8-10
This is the core part of the payment flow, where the user must select a bank (if the saved bank is incorrect), authenticate with it, and ultimately authorise the payment. This flow can take place either in the Roqqett app or in a Roqqett supported browser.
info
If the payment starts on a desktop browser, then the customer is offered several options to complete the journey. They can either stay on desktop or preferably move onto a device with a banking app installed. For the latter, a QR code and link via SMS are offered to transfer them onto their mobile device for a faster journey that integrates seamlessly with their banking app(s).
Steps 11-13
If the customer authorises the payment, they are taken back to Roqqett, which then displays the receipt and informs your site of the successful payment via webhook.
If the customer cancels the payment, they are taken back to Roqqett and given the option to retry the payment with a different bank or return to your site. If they select the latter, Roqqett informs your site that the payment was cancelled via webhook.
See how this compares to Roqqett Pay, which is best when using Roqqett only to take payments.
Setup guide
Before you begin
- Ensure you have registered and have API keys .
- Ensure you decided which integration method you will be using out of Plugin integration or Javascript integration .
- Ensure your organisation settings are configured correctly in the Roqqett portal .
- Ensure you understand the payment flow. See this page for more information .
Step 1: create a Roqqett Checkout instance for your business
- In the Roqqett portal , go to the Checkouts area.
- Click the Create checkout button.
-
Provide the required fields:
- Checkout name: this is free text that will be used in to identify payments in the Payments table.
- Default return URL: the URL where we should send the customer after successful payment, typically the order confirmation page on an eCommerce store.
- Webhook Url: the URL of the endpoint where Roqqett should send payment Webhooks . If using a plugin , this URL will be displayed on the settings screen.
- Tick Collect shipping address .
- Tick Test mode if you'd like this checkout to process test payments as well as real ones.
- Press next and then if your products require delivery, tick Shipping . In the options displayed, tick one of:
- Fixed: to set up a fixed shipping price for all orders and addresses.
- Dynamic: to provide an API endpoint where Roqqett can retrieve calculate shipping costs for a particular cart and address.
- Finally, tick and configure the features you want to use to enhance your post-sale customer experience.
- Click Save .
Step 2: add Roqqett Checkout to your cart summary page
Regardless of whether you integrate using a plugin or Javascript, the key thing is to use the correct checkout ID and API secret.
The checkout ID is the ID of the checkout that you created in the previous step.
The API secret is the secret that you created when setting up your API authentication.
Once you've confirmed these, follow the appropriate instructions for the type of integration that you're implementing: plugin integration or Javascript integration.
Step 3: confirm that payments are working
Once you've integrated, the last thing to do before going completely live is to make some small denomination payments on your site. You should check that they flow through your portal and bank account to ensure everything is in order. The Roqqett crew will be there to help you through any testing and service assurance activities.
Production environment only
Currently there is no test environment, so please exercise care when testing. We are working hard to release a test environment soon, so watch out for comms on developments. Roqqett has extensively tested the bank integration and payment flows. We recommend testing your deployment with a small payment amount to check everything is working as expected.